Discussions can be used for students’ to share documents, pictures, presentations, videos etc. should be visible for all students in the course – and allow students to comment or give feedback on each other’s work.
Using discussions in your teaching will provide you with a range of pedagogical possibilities. You can:
- Provide your students with training of written communicative skills
- Stimulate reflection
- Use discussions as a link between lessons – encouraging students to discuss the content of the course between lessons
- Encourage other types of students than students who prefer the oral dialogue in class
- Support study groups and interaction between students
- Communicate with your students online/outside of class
- Encourage your students to support and learn from each other.
Read our full article about the pedagogical use of discussions here.
Video tutorial on discussions
General settings
Go to ‘Discussions’ in the course menu on the left. Here you have the list of discussions in your course.
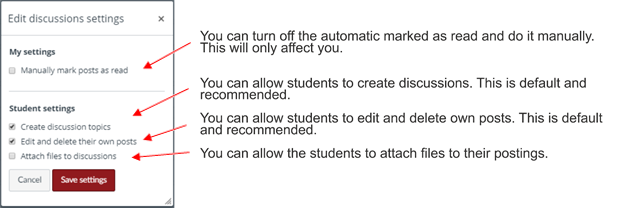
![]() Click on the cogwheel in the top right and the general settings will appear:
Click on the cogwheel in the top right and the general settings will appear:

Please note that these settings are universal for all the discussions in the course.
How to create a discussion
Go to “Discussions” in the course menu on the left. Here you have a list of all the discussions created in your course.
Click the + icon to create a new discussion ![]()
- Add a topic title
- Describe the discussion with the rich text editor. This is the main post of the discussion, where you post the purpose of the discussion e.g. learning goals, topics and questions and maybe define how you want your students to respond.
- You can add files related to the discussion.There are several options supporting different needs:
-
- Allow threaded discussions, a graphically proper way to visualize the different branches of the discussion (discussion threads). We recommend that you use threaded discussions.
- Make the students post a comment before being able to see the posts of the other students, a useful feature if you want to encourage so called ‘lurkers’ to participate, or if the discussion questions have one or very few right answers.
- Grade a discussion and thus add it to the Assignment list of the course
- Turn on a liking function and, secondly, choose to sort posts according to liking’s. This could be relevant, if there are no right answers to a discussion question, allowing the teacher and students to ‘vote’ for good answers.
- Split up the discussion according to student groups. You then have to choose a Group set containing the groups. Each group will have their own discussion forum and cannot access the other fora. The teacher, however, can access all fora.
- Limit the discussion to a specific time slot

How to pin and filter discussions
Discussions can be pinned (made more visible to the students), and they can be closed for comments. These possibilities provide you with three different sections on the course list of discussions, as illustrated below. You can drag and drop the discussions between the sections or by the choices under the tooth wheel.
- You can filter by keywords in discussion title and first post or filter by the names of the participants. Clicking the buttons ‘Unread’ and ‘Assignments’ will filter the discussions to show only discussions with unread posts and/or graded discussions.
- Pinned discussions: keep the current discussions easy accessible. Pinning a discussion allows you to accentuate specific discussions for your students.
- Discussions: list of ongoing discussions in the course. Discussions containing the most reason postings will appear at the top of the list.
- Closed for comments: new postings are not allowed but the students can still read closed discussions.
How to subscribe to a discussion
Furthermore, you can subscribe to a discussion by clicking the icon of the blue speech bubble to the right of a discussion on the list. This means that you’ll receive a notification whenever someone posts a comment, leaving you up-to-date without having to check the actual discussion.

